Fast and Fun: DIY Bookends to Make You Smile
With the outset of the school twelvemonth, there'south a greater emphasis on all things academic. Like books. If your household has a volume lover or iii, you might be interested in this fast, fun, and like shooting fish in a barrel DIY project: DIY bookends. The possibilities are endless with the strategy to tell a story with the bookends that surround your stories. Here's a quick tutorial on making this fun project.

 View in gallery
 Materials Needed to Brand Cool Bookends:
- Metal bookends, in the size of your option
- Toy dinosaur & toy soldiers
- Super gum & hot gum
- Spray paint
- Box cutter/razor blade
- Permanent marking
 View in gallery
 Step One: Planning for DIY Bookends
Determine which management you want your absurd bookend "story" to go. And so hold the dinosaur upward to one of your bookends, and draw a straight line where you desire to cut it. The line should be straight at eye level, not necessarily in relation to annihilation on the dinosaur itself.
 View in gallery
 Utilize a box cutter to advisedly slice the animal along the line.
 View in gallery
 Yous'll have ii pieces now, hopefully with a crisp cut. Trim whatsoever jagged edges or bumps and so the cut is flat.
 View in gallery
 Stride Two: Gluing Your Kid's Bookends
Decide where y'all desire the back/footed piece to go. Try and line them up so when in place they tell the story.
 View in gallery
 Run a thin bead of super mucilage anywhere along the dinosaur where it volition touch on the bookend. This includes the cut line, of course, and also the feet or other points of contact.
 View in gallery
 Place the dinosaur against the bookend. Information technology will likely slip and slide effectually a bit.
 View in gallery
 Step Three: Securing the Object
While holding the dinosaur in place, run a bead of hot glue around all the points of contact. Basically, this is to proceed the dinosaur in identify until the super glue dries, which can be a while. Run the hot glue all the mode around the contact surface area, if possible, for a more camouflaged connection.
 View in gallery
 When the hot gum dries, utilise the box cutter to advisedly cut off any strings or drips.
 View in gallery
 Set the bookend aside to permit it absurd and dry out completely. This is an important step in making your cool DIY bookends every bit it will ensure it'southward all gear up before use.
 View in gallery
 Step Iv: Repeating for the Other Book Stop
Identify the 2nd bookend side by side to the outset i, and position the head of the dinosaur advisedly to align horizontally.
 View in gallery
 Apply a permanent marker to mark where the positioning should be.
 View in gallery
 Utilise the same super glue/hot glue steps to position and secure the head to the second bookend.
 View in gallery
 Step Five: Calculation Accessories to Book Ends
When the head is in place, information technology'south time to position the toy soldiers. Super mucilage then hot mucilage these in place likewise. I love this step because you can get creative here with your DIY bookends. Like, if you had a daughter who loved dinosaurs and ponies, yous could use tiny pony figures instead of soldiers.
 View in gallery
 Stride Six: Painting DIY Bookends
Prepare the bookends out on a driblet material and spray them with the color of spray pigment of your choice. This case ended up with matte black spray paint as the final coat.
 View in gallery
 Allow everything dry completely.
 View in gallery
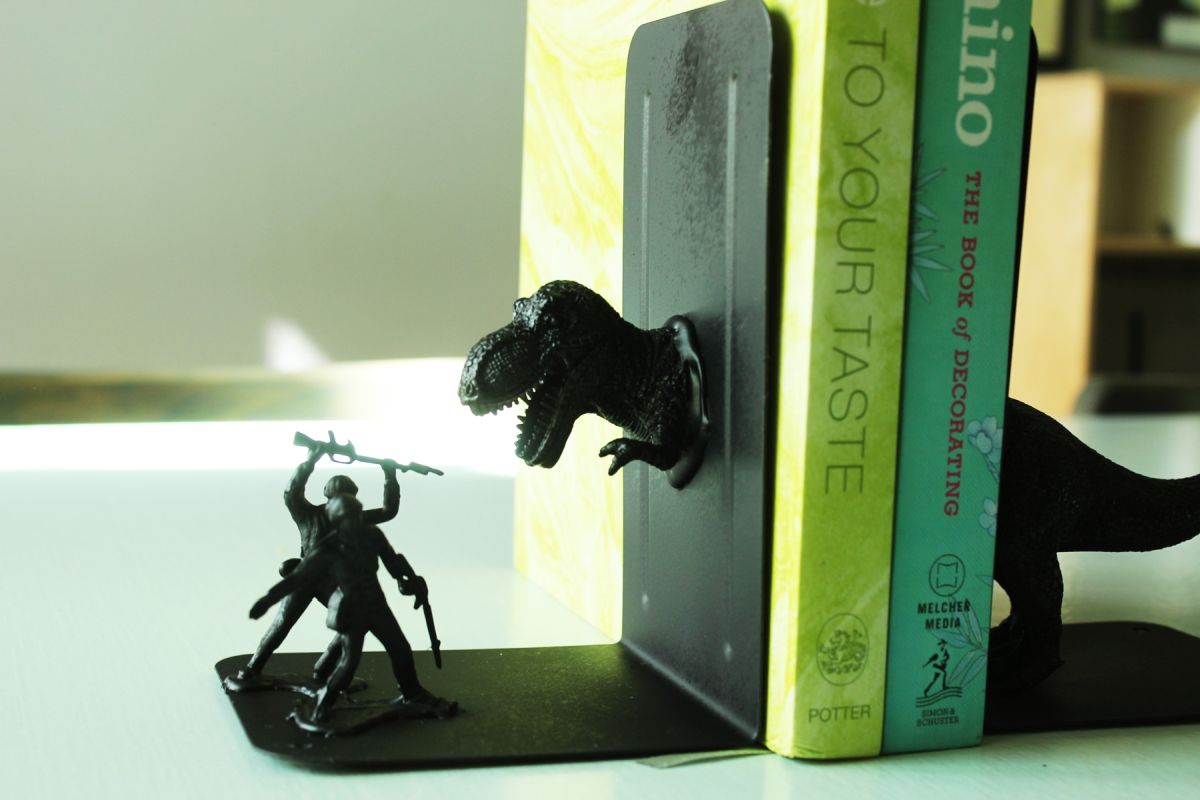
 And voila! Slide your books between the bookends. Done! These would also brand a great gift for friends and family, or that reader in your life.
 View in gallery
 These bookends have fabricated everyone in our household smile already.
 View in gallery
 Ane trait that makes bookends that tell a "story" then fun is that it doesn't affair how many books are between them. The humor is still there, simply a delayed punch line perhaps.
 View in gallery
 Equally you can meet, the hot gum is visible but not distracting when everything's all painted the aforementioned color.
 View in gallery
 We promise you lot savour your new DIY bookends virtually every bit much as you love reading what's between them.
 View in gallery
 Happy DIYing!
Source: https://www.homedit.com/fast-fun-diy-bookends-make-smile/
0 Response to "Fast and Fun: DIY Bookends to Make You Smile"
Post a Comment